
This article will teach you how to set up checklists templates in your Cirrus site from scratch
Checklists are the basis of Cirrus’ ability to request and organize documents. The setup process allows you to create multiple different checklist templates for process management. There are a few steps you need to follow to set up an entire checklist.
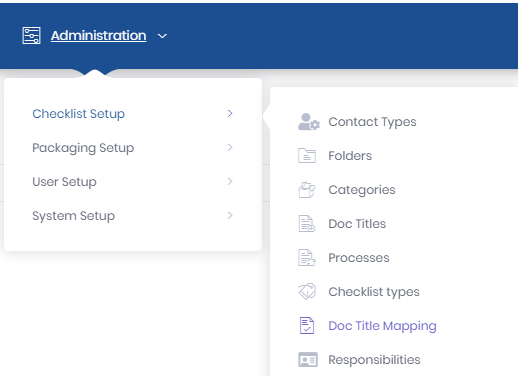
To begin, go into Administration > Checklist Setup. We will work out of this menu for the remainder of the article.
Look at the menu, you will follow the order of setup from the top down. Note that Contact Types is a new premium feature. If you are interested in learning more about Contact Types, then please contact sales@cirrussecure.com.
1. Start by creating your folders
Folders are groupings of doc titles within a checklist. Users often group documents like tax returns and financial statements together. Your Cirrus support representative can assist in recommending options for your folder groupings.
To create a folder, click the Create new folder button in the top right of the screen. In this menu, you are only required to create a folder name. The label and description are optional. Create at least one folder, though multiples are recommended if you have a large number of documents you will collect as part of your process.
*Don't worry, you can go back and add more Folders later, and you can move your Document Titles (Doc Titles) around later if you need to!
2. Create Categories
Categories Relate to different requirements of a checklist or Deal. There should always be a Standard category. This means documents that are always included in that Checklist type/process. Non-standard documents that should only be added if the non standard Category applies.
In some cases, we can think of Categories as Parties. So, in a Mortgage, there are the Standard documents that are added to the deal. However, there may be a co-signer. In that case, we can create the non-Standard category of "Co-Signer" and when we create our Checklist, we add one non-Standard Co-Signer to the deal. When we create the Checklist, we then will see the Standard set of documents added, PLUS the documents needed from a Co-Signer.
Note: Max Usable is the number of additional sets of category documents you can add to a checklist. For example, you know you will have 4 Guarantors, and 3 are non-standard. In your policy you always have 1 guarantor, but since you have a total of 4, you have 3 non-standard guarantors. You can allow up to 25, and can choose this.
Note: You will need to create a standard category for doc titles that are necessary for the deal, but are not related to a specific party. Make sure to check the "Is Standard" checkbox to set the designation. The best way to see your Categories in action is to create a test Category, assign a DocTitle to it, and then then create a Checklist. Creating a checklist requires Types and Processes as well, so do this after you have completed Steps 1-4 (Folders - Processes) to review Categories.
3. Now it's time to create Doc Titles
"Doc Title" is our shorthand for Document Titles. Doc Titles are any and all documents required by you in your loan file/checklist.
In the Administration menu, click Checklist Step > Doc Titles, and click the "Add Doc Titles" button. Start by selecting the Doc Titles Category and Folders.
Add the name, a description (if needed), and then the responsible party (borrower, guarantor, etc). The responsible party is visible to both you and your borrowers, and tells them who will provide a document.
Click the check boxes for Display on checklist and Sort by category label. The first ensures the doc title is visible, and the second groups documents by their label.
Finally, add a number to the display order. The number 1 works to start, and you can learn how to update the display order on your Doc Titles later using this article. Make sure to click save after completing each doc title setup.
For more details about adding Doc Titles, click here.
4. Define your Process
After you have created your Doc Titles, you need to create your process(es). A Process defines the set of steps involved in a specific loan deal, as well as the documents associated to each step.
To create a process, navigate to the Processes option under Administration > Checklist Setup, and click "Create new process" button.
In the menu add a name for the Process. You can add a description, but it is not required. Finally, you can decide if you want this process to de your default process. New checklists will automatically be set to the Default Process unless your user chooses otherwise.
Once the process is created, click on it's name in the list of Processes. Select the Process Stages tab. You create each stage of your process here.
- Click "Create new process stage" on the right side of the screen, and in the menu, add the process name, optional description, and you can decide if the stage is considered “Closed” this will be used to track the time it takes to move a loan through your process in the future. Once all of your processes and stages are created, you can move on to types.
5. Create Checklist Types
Where processes designate a set of documents or specific or type of collateral, types designate the overall loan type (i.e 7a, 504, construction, etc.). To create a checklist type, click the Create new checklist type button. Add a name to it and hit save.
6. Doc Title Mapping
The last step is to map doc titles to a type and a process.
Start by selecting a type in the first dropdown, and a process in the second. Then, drag the relevant documents or folders from the left side of the page to the right. You can drop the documents into different stages of the process to make them appear during certain stages of the loan process. Once these are assigned, save the changes and you are done. We do recommend you test the setup by creating some new checklists to confirm everything is correct.
If you have any questions or need assistance with the setup, please contact your Cirrus support representative.